 |
|
1.
What is X-PRO?
X-PRO
is a software telephone. It has many of the features of
a traditional business
telephone, including call conferencing, multiple lines,
and call transfer.
Instead of making calls over the regular telephone
network, calls are made over computer
networks, either through your Internet Service
Provider’s connection or through your
local network. This is called Voice over Internet
Protocol – VoIP.
Calls made to another Internet telephone, anywhere in
the world, are generally free, while
calls made to a regular telephone are generally much
cheaper than traditional long
distance calls.
Xten Networks, Inc. does not provide telephone service;
only the software to use such
services. See the section below on where to find a
service provider. |
|
2.
Getting the Right Information from your Provider
- If
you received X-PRO from your VoIP service provider,
it will likely be configured
automatically.
- If
this is not the case, then you will have to get the
following information from your provider:
- User
Name
-
Password
-
Authorization User*
-
Domain / Realm
- SIP
Proxy address and port
-
Outbound SIP Proxy address and port*
- You
will need this information to configure X-PRO as
described in Section 8 later on in
this guide.
|
|
3. Installing X-PRO
4.1 Windows Installation
- Exit
any software applications that use sound such as CD
and media players.
- Run
the setup executable file. This will typically be
the X-PRO_Install.exe file
(or something similar). Note: If you have a version
of an Xten softphone already
running you will be asked to shut it down.
-
Follow the prompts offered by the install wizard.
Note: You must accept the
license agreement to install X-PRO.
-
Select Launch X-PRO at the final step of the wizard
to start using the softphone.
-
Click Finish to complete the installation.
|
|
4.2 Macintosh
Installation
- The
download file is an internet-enabled disk image;
therefore most browsers
should mount it automatically. However, if this is
not the case, locate the .dmg
file after download and double-click on it.
- Read
the license agreement and click "Agree" to proceed.
Note that you must
agree to the terms of the license agreement to
install X-PRO for Macintosh.
-
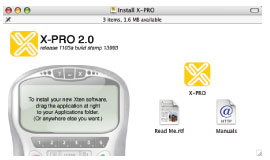
sSimply drag the application icon (shown in Figure
1) to the folder in which you
wish to install. This will normally be your
Applications folder. If you do not
have permission to install to the Applications
folder you will most likely want to
install to your home folder instead.
 |
|
4. Running X-PRO
5.1 Running X-PRO for Windows
-
Click the Start button.
-
Select Programs.
-
Select the folder labeled X-PRO. (or whatever you
choose as the Start Menu
Folder during the installation)
-
Select X-PRO. (or the appropriate application name
if you have a co-branded
|
|
5.2 Running X-PRO for
Apple Macintosh
- Open
the folder where you installed X-PRO, usually in
Drive/Applications.
-
Double-click the application icon.
|
|
5 .The Audio Tuning
Wizard
Since X-PRO is a software telephone application, you
will require both speaker and
microphone devices to make calls. Any of the following
configurations are acceptable:
-
External speakers and microphone (requires a
full-duplex sound adapter)
-
Dual-jack multimedia headset (requires a full-duplex
sound adapter)
-
Built in microphone and speakers (requires a
full-duplex sound adapter)
- USB
multimedia headset
- USB
phone
 |
|
When X-PRO
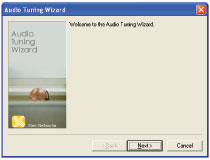
runs for the first time, it will open the Audio Tuning
Wizard as shown below in Figure 2. It is strongly
advised that you complete the wizard to make sure that
your audio devices are working properly and are set at
the right level.
Click Next to begin the wizard and follow the steps to
complete your audio device calibration. If you cannot
complete the wizard successfully, check to make sure
that your devices are plugged in and are working
properly for other applications that employ audio. |
|
6. Getting Acquainted
with X-PRO
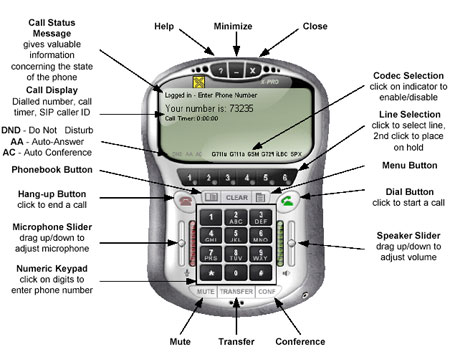
The X-PRO dial pad, along with along with its various
controls and indicators is shown
in Figure 3 below.
 |
Help
Minimize Close
Codec Selection
click on indicator to
enable/disable
Line Selection
click to select line,
2nd click to place
on hold
Menu Button
Dial Button
click to start a call
Speaker Slider
drag up/down to
adjust volume
Transfer Conference Mute
Numeric Keypad
click on digits to
enter phone number
Microphone Slider
drag up/down to
adjust microphone
Hang-up Button
click to end a call
DND - Do Not Disturb
AA - Auto-Answer
AC - Auto Conference
Call Display
Dialled number, call
timer, SIP caller ID
Call Status
Message
gives valuable
information
concerning the state
of the phone
Phonebook Button |
|
7. Setting Up X-PRO
Manually
If your VoIP service provider did
not configure your X-PRO automatically, you can
configure it manually by following the steps below.
1. Start X-PRO.
2. Press the Menu button, to the left of the green Dial
button. (see Figure 3)
3. Select System Settings.
4. Select SIP Proxy.
5. Select [Default].
6. Set the following fields:
Enabled. Yes
Display Name. your name
User Name. [from Your VoIP Provider] (often your “phone
number”)
Authorization User. [from Your VoIP Provider] (may not
be needed)
Password. [from Your VoIP Provider]
Domain / Realm. [from Your VoIP Provider]
SIP Proxy. [from Your VoIP Provider]
Outbound SIP Proxy. [from Your VoIP Provider] (may not
be needed)
X-PRO Quick Start Guide |
|
After you
have finished entering all of the necessary settings,
close the menu, and X-PRO will register with your VoIP
provider. When you have successfully registered with
your provider, you will see “Logged in – Enter Phone
Number” as the Call Status Message |
|
8. Making a Call
- Open
X-PRO.
-
Allow it to detect your network environment, and
login with your VoIP provider.
This will take a few seconds – check the Call Status
for “Logged in – Enter
Phone Number” which indicates that you are ready to
make a call.
-
Enter the phone number, or SIP address using your
keyboard, or with your mouse
using the numeric keypad on X-PRO.
-
Click the green Dial button.
|
|
Tips
- You
can place the call on hold by clicking the line
button of the call that you are
on.
- You
can start a call on another line by pressing an
inactive line button. This will
place the other lines on hold.
- You
can redial a number by clicking on the last number
dialed shown in the call
|
|
9. Answering a Call
You need to have X-PRO running to answer an incoming
call. X-PRO will ring like a
traditional telephone. To answer the call, click the
green Dial button. |
|
10. Ending a Call
To end a call, click the Hang up button. (see Figure 3)
As with traditional telephony, a
call is also brought to an end when the other party
hangs up. |
|
11. Extended Calling
Features
X-PRO also supports the following extended calling
features normally available in
business phones. Refer to the X-PRO User’s Guide for
more information on these
features and details on how to use them.
- Call
Conferencing
- Call
Transfer
- Do
Not Disturb
-
Auto-Answer
-
Auto-Conference
|
|
12. Trouble-Shooting
See the X-PRO User’s Guide for trouble-shooting
information. Included there will be
useful tips to help resolve a variety of issues which
may occur when using the softphone. |
|
Top |
| |